

Growing from Seeds
Starting Indoors
Seeds that have a longer maturity date or do best when grown as a transplant will grow much more successfully if started indoors. Prior to planning your garden, first determine which seeds you will need to grow indoors as well as how much space you will need. Conveniently located on the back of each Veseys seed package is information which explains when and how to start that seed variety. Once you have determined which plants you need to start inside, you can then start thinking of gathering up the containers, soil and starting supplies that you will need as well as the space and light requirements that will help make your starting process a success.
Note:
For specific variety growing instructions please go to the specific product page on our site and scroll down to the Growing Instructions section. See example here: Napoli Carrot
Soil
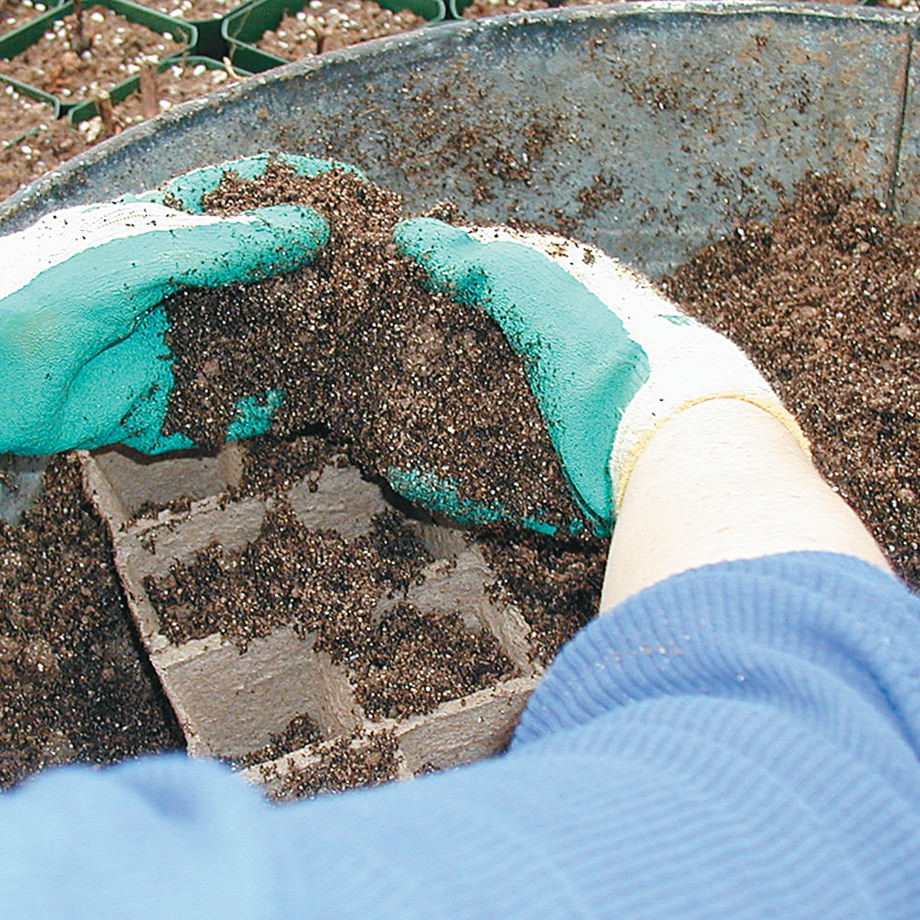
When starting seeds indoors, a soilless, pre-mixed growing medium is best to use. Soilless mixes are generally made up of peat, perlite (ideal for improving drainage) and vermiculite (aids in water retention), along with added nutrients. These mixes are light and sterile which makes them best for successful germination and growing on.
Sowing
The planting depth will vary per variety. Check the product page on our website or the back of your seed package for correct planting depth and spacing for the specific variety you are planting.
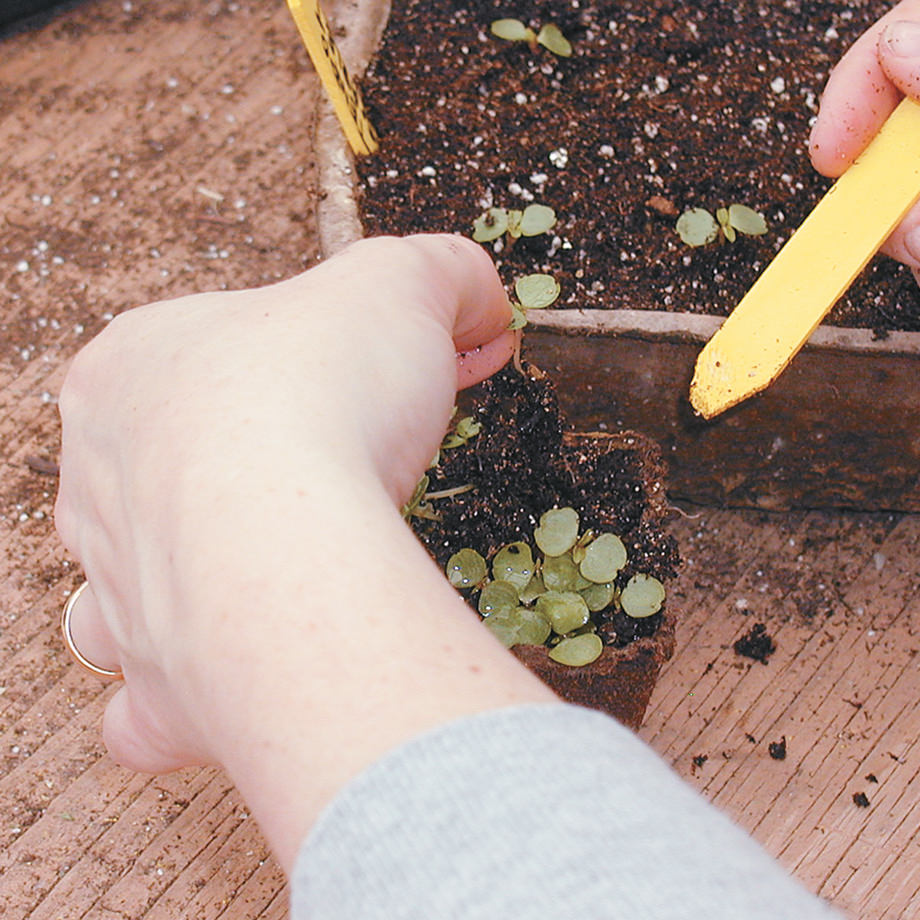
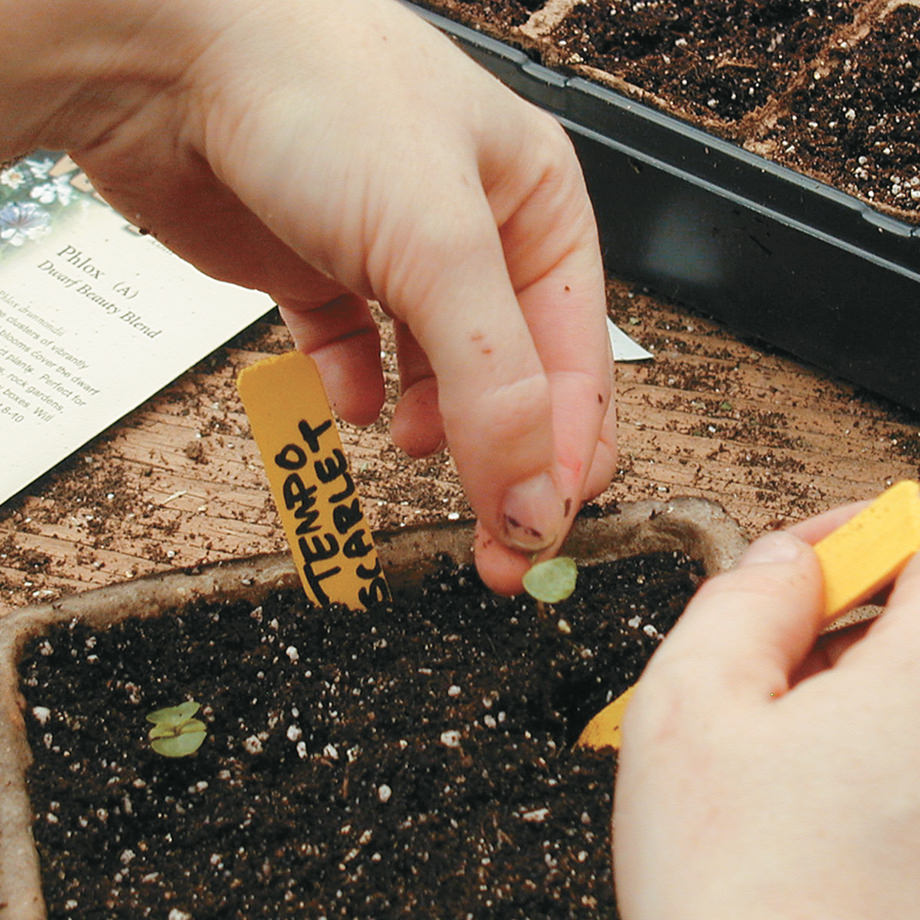
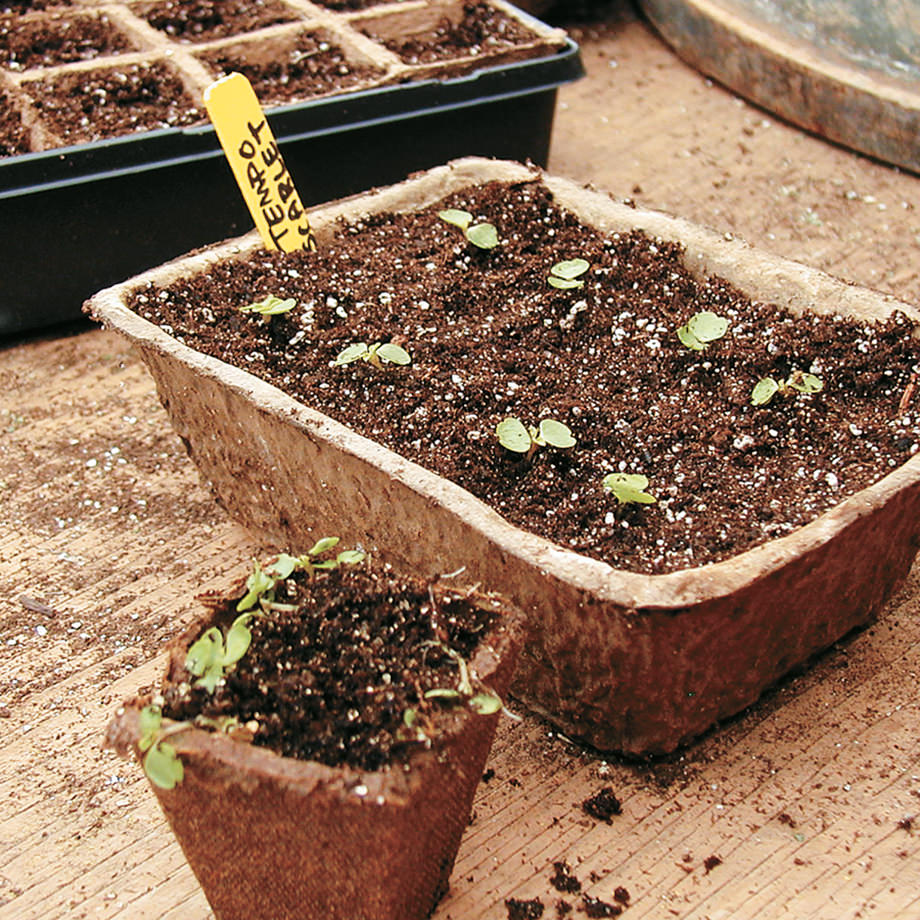
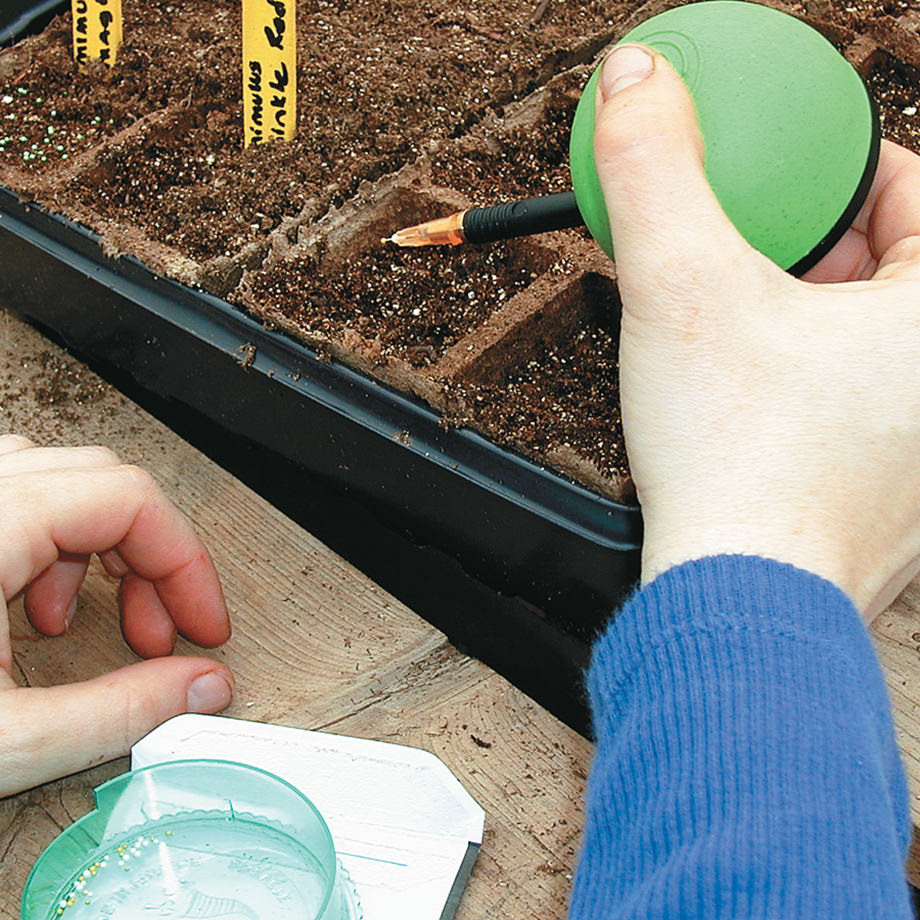
After germination, the tiny seedlings can be separated and transplanted into larger containers. Light levels during germination is important for most flower seed varieties unless otherwise specified. Most plants can be grown in fiber pots as mentioned. Some vegetables, such as lettuce and the brassica family (cabbage, cauliflower, broccoli and some oriental vegetables), can be directly sown into 1″ cells with one plant per cell. Growing in cell packs helps to eliminate root disturbances at the time of transplanting.
Soil Temperature
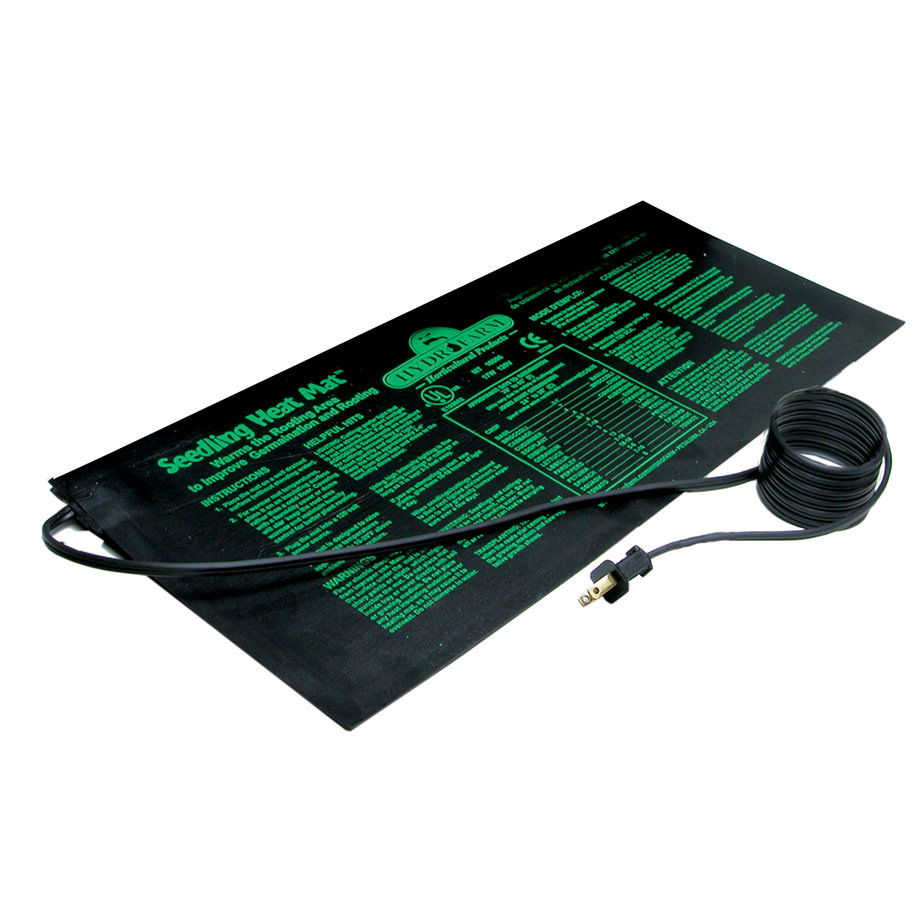
Refers to the ideal temperature of the soil required to initiate germination. Most seeds germinate at a soil temperature of 18-22°C. Keeping the temperature within this range can be hard, especially for seeds like peppers which take more than a week to germinate. Regular air temperature is generally warmer than the soil temperature, and is not sufficient enough to warm the soil. For best results, try using a propagation mat, heating cable or a hotbed.
Soil Moisture
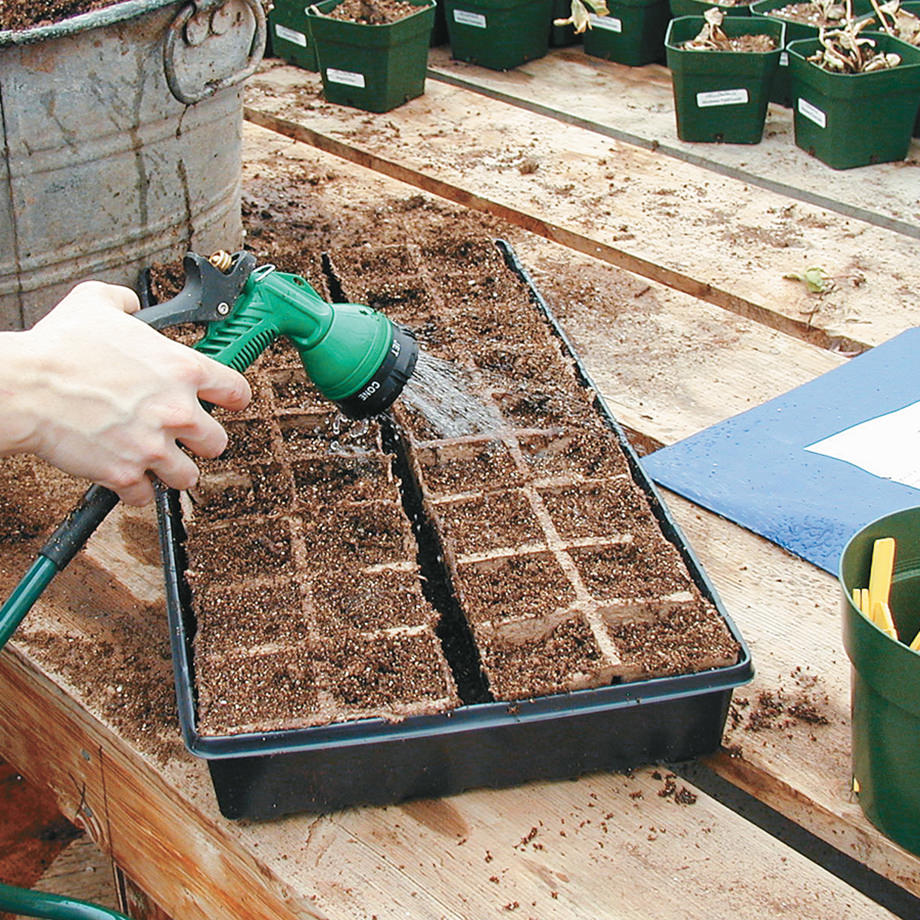
Soil moisture is equally as important as the temperature. The seed needs water to help soften the seed coat and stimulate the root development. Once the root has penetrated into the soil, the young seedling emerges from the soil towards the light. If the soil is allowed to dry during this process, the germination will be delayed or, in most cases, ended. To keep the soil moist, mix the growing medium with water, enough so that if a handful is squeezed, a small dribble of water will run out. After mixing, sow your seeds accordingly and then cover the containers with clear plastic, this can be anything from freezer bags, plastic wrap, or the clear domes which come with some of the large holding trays. Using the plastic covering will help to keep the moisture and humidity in the soil. After germination, be sure to remove the plastic and place plants under grow lights to prevent legginess or stretching. Lack of light will stress plants causing them to be more vulnerable to pest and diseases.
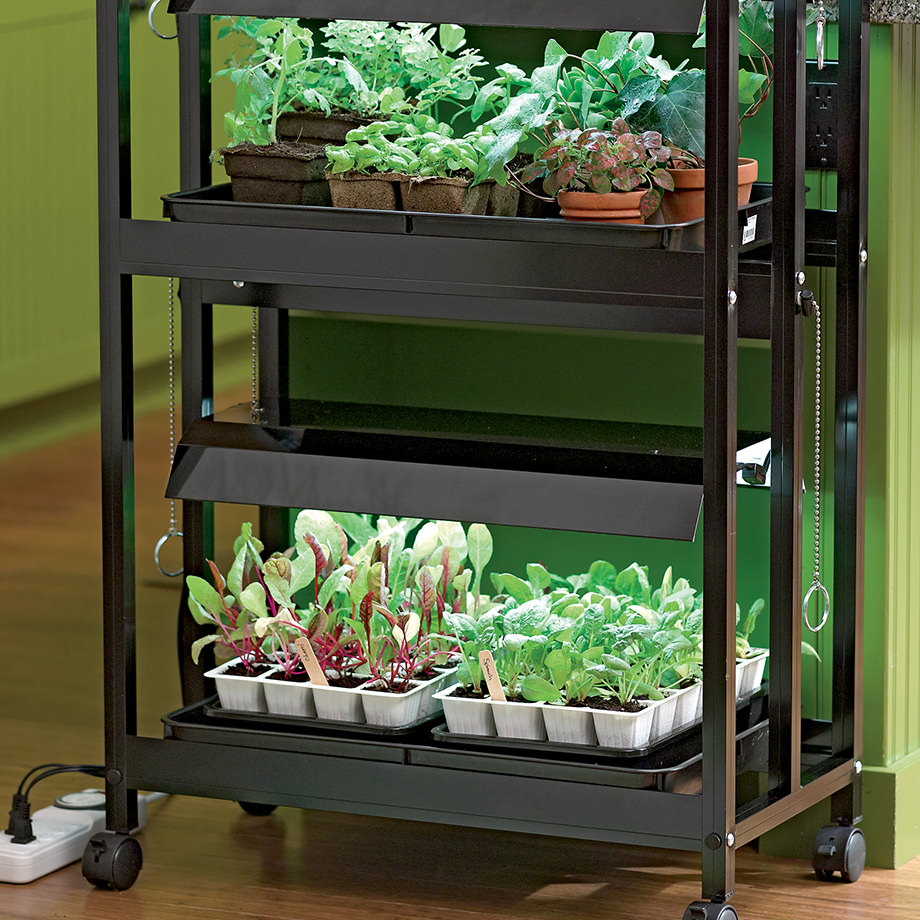
Lighting and Fertilizing Seedlings
Lighting is critical when starting plants indoors. Without sufficient light, your plants will become tall and leggy, which in turn will make them prone to bending and breaking. When growing plants indoors, make sure you have at least a bright south facing window along with an adjustable fluorescent light suspended from the ceiling, or use a table top or shelf style of lighting stand to hang over the seedlings. Young seedlings will require 16 hours of light and the plants must be 3-4″ from the lights at all times for proper growth. Feeding plants, whether they are in the garden or growing as transplants indoors, is important. You will need to start fertilizing young seedlings with a mild or small dose of a balanced fertilizer. Some fertilizers include fish emulsion, compost tea and blended fertilizers such as 20-20-20 or 15-30-15. Whichever fertilizer you use, be sure to dilute to half the strength for the first few feedings and then gradually work up to full strength. Feed plants weekly.
Watering
When watering new seedlings it is very important to follow some simple guidelines to avoid the spread of diseases that can attack and destroy newly emerging plants. The most common disease is known as damping off which can attack a seed before it germinates but is best recognized as rot at the base of the plant causing irreparable wilt. The following instructions will help you maintain a healthy crop by providing a disease resistant growing environment.
Do: Use sterile, well-draining soil and containers. Sterilize old containers in a very mild bleach solution. Use fresh, pH neutral soil. Use containers with proper drainage holes and water plants from the bottom. Provide good air circulation at all times. Sprinkle a thin layer of sand or perlite on surface to keep stems dry at the base by absorbing excess moisture.
Avoid: Acidic soil. Watering from the top Transplanting or taking cuttings when soil is wet. Excess watering. Letting the soil dry out completely. High humidity. Over crowding of seedlings. Crowns that are below soil level.
Moving Outdoors
Most vegetables and flowers require at least 6-8 hours of light each day. The best light is the morning sun from sunrise until noon, as this is the time of day when plants put on the most growth. A full sun area that has southern exposure is ideal. Select a site which is close to a garden shed, water source and not too far from your house.
Preparing the Garden
Taking time to prepare the soil for your flower or vegetable garden is one of the most important steps to ensure it grows successfully. If you are unsure of the pH, how much organic matter or macro and micro-nutrients, then this may be the best time to have your soil analyzed. You can either do this test yourself with a test kit you can purchase or take a soil sample to your nearest soil lab. By doing this, it will take the guess work out of how much fertilizer, lime etc. you would need to add. If over the course of time, you are finding that your garden isn’t performing as well as it had in the past, may also be good reason to have a soil analysis done. Again this will determine any issues that can be easily rectified prior to planting. It is recommended to do any of these tests in the fall, make your amendments then and by the time spring comes, you will be ready to plant.
Through-out this garden resource, it makes reference to adding organic matter, either in the form of compost or well-rotted manure to the garden prior to planting. Organic matter helps to loosen or fluff up the soil to allow for better water and air movement, attracts beneficial soil organisms such as worms and bacteria and supplies a slow release source of essential nutrients. It is recommended to add a 2-4 inch layer of organic matter and then incorporate by mixing to a 6-8 inch depth. For some home gardeners large amounts of compost or even manure may not be readily available. Some alternatives which can be purchased at Garden Centres include Peat Moss, Composted Sheep or Cattle Manure, Top Soil and Compost.
The best use of space in the garden is to prepare raised beds which are usually 3-4 feet wide and can be any length. The width is important because of the bending and stretching you will have to do to work in the garden. Raised beds have other benefits as well. The soil warms up faster, has better drainage and has a deeper tilth for growing root crops like carrots and potatoes. Another added bonus is that it is also harder for weeds to take over the edges of your garden and from spreading.
Fertilizers
Garden fertilizers come in all types, including organic and synthetic. Organic fertilizers come from a natural source like fish emulsion, bone meal, blood meal or green manure crops. These fertilizers have a lower ratio of N-P-K that releases the nutrients slowly over a long period of time. Synthetic fertilizers are manufactured to provide a quick boost to plants, they come in many different ratios so are more plant specific. Both types contain many micronutrients essential for plant growth. Either type, or a combination of both can work well in the garden soil if they are applied according to instructions to prevent toxicity in the soil. Compost or other organic matter will add nutrients as well as improve the structure and quality of any soil.
Liquid fertilizers are used as a supplement food for plants during the growing season. Most plants benefit from regular feedings of a water-soluble fertilizer these can be organic or synthetic. Follow instructions on each label for the frequency of feeding.
Granular Fertilizers are generally applied in the spring or fall before planting a garden bed. They should be well incorporated into the soil.
Lime: The ph of the soil is very important, if it is too low the fertilizer will not be readily available to the crops. However, some plants like blueberries require low ph to thrive. Lime is available in powdered or pelleted forms and should be regularly applied to gardens for best performance.
Tip: Epsom salts is made up of a magnesium sulphur compound, plants use magnesium to help take up other essential nutrients such as nitrogen. It can be added once a month in regular watering to reduce blossom end rot on fruit such at tomatoes and peppers. If worked into the soil it will improve blooms on roses and shrubs.
Planting Time
It is recommended to wait until the risk of all frost has passed to plant the garden. Plants germinate and grow much more successfully once the soil has warmed and daylight has lengthened. Of course there are a few vegetables that enjoy the cooler temperatures and those recommendations are noted within each individual growing instruction or on the back of each seed package. Frost dates are very specific for each region. Know your area; low-lying gardens tend to get the first frosts, whereas higher areas may be planted at an earlier date. Another indication of when to plant is once the soil warms up to 65°F (18°C). Some gardeners even rely on planting after the full moon in June which still remains to be an ideal rule of a green thumb!
Seeding and Transplanting
When direct seeding, overseed to ensure you will have sufficient germination. After germination, thin seedlings to the desired spacing.
For direct seeding, follow the instructions on the back of each individual seed package. If conditions are hot and dry and you plan to direct seed, it is best to plant in the evening. Open the drill and water the soil, plant the seed and then cover the seed over. This usually works well for summer planting to ensure rapid and even germination. To get more from your garden, try direct seeding early maturing crops like radish and leaf lettuce or one of the companion crops, under your transplants, these crops can be harvested before the transplants get too large. Transplant tomatoes, peppers or any other vegetable to its desired spacing.
As with any new plant introduced to the garden, watering is very important so they can establish a good root system. Be very vigilant about weeds so they don't take over or compete with your new seedlings. Mulching plants helps to conserve and hold moisture in the soil, slows weed growth, and depending on the crop, keeps the soil warm or cool. Various types of mulches include straw, leaves, grass clippings or a generous layer of compost. Black plastic mulches that now come in a convenient biodegradable form are used to draw heat into the soil for crops that prefer a long warm season such as tomatoes, peppers and melons. Flower beds are generally mulched with shredded bark no thicker than 2″. Keep mulch away from stems and crowns to prevent rotting. A winter mulch can be applied to protect newly planted or tender perennials. This can be straw, evergreen boughs, leaves or eelgrass.
Please Note: Perennials and other flowers seeded in the garden frequently fail to germinate properly because the surface of the soil cakes and prevents entry of water. To avoid this, sow the seeds in vermiculite-filled furrows. Don't let the seeds dry out or your seeds will die. Keep seedlings covered with a shade cloth or 'Reemay' blanket while they are young and tender to prevent sun burn or breakage from wind, animals, pests and diseases.
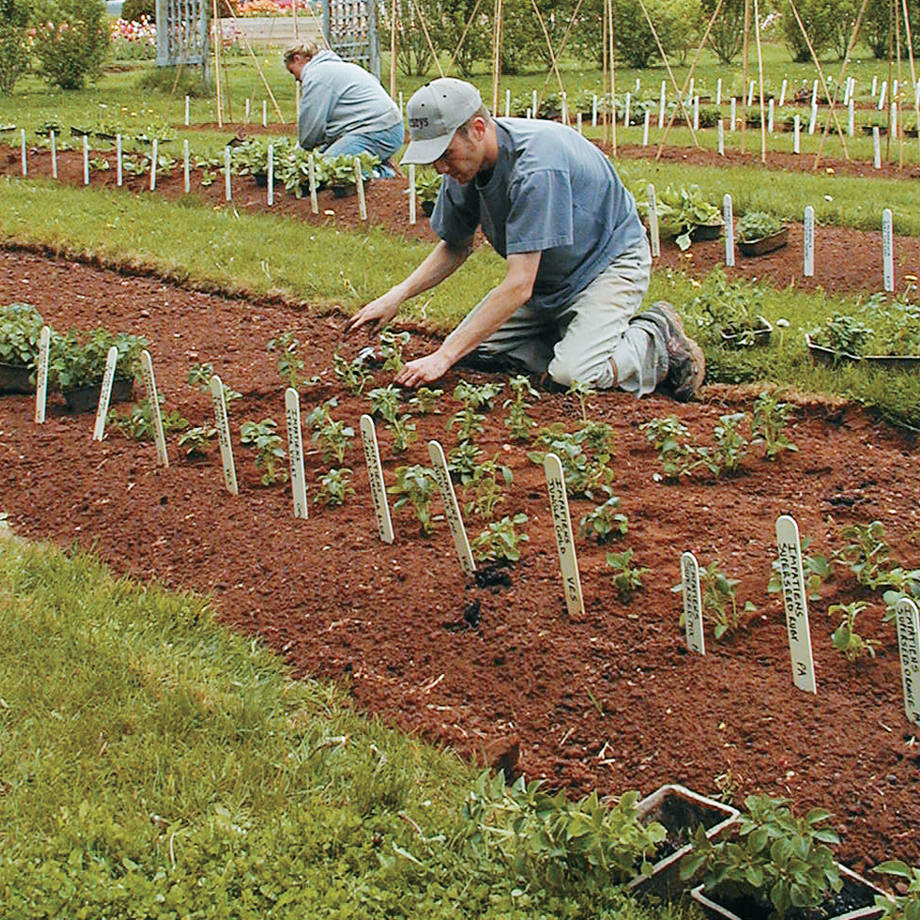
We recommend you harden off your transplants prior to planting in your garden. Keep in a cool bright room, and place outside on mild days and gradually leave outside for longer periods of time. After a week or so, or when nighttime temperatures are above freezing, plant outside. If a severe dip in temperature is expected, you may want to place straw or an old blanket over the green leaves to protect them from severe damage. Frost or cold will not permanently hurt the plant, but it may damage the new leaves and set growth back. When setting your plants outdoors it is recommended to find a sheltered, part sun location. This will be an ideal setting for your plants to adapt to the outdoors preventing shock or stress. If the evenings are cool, plants may need to be moved indoors overnight and set back out once temperatures warm.
Common Germination Problems and Solutions
- Seeds are planted too deep: We list this problem first, because many seeds end up too deep in the soil, and never see the light of day. Before planting, check the seed packet or our Growing Guide for individual planting instructions. Be sure to plant the seeds no deeper than the depth indicated. For tiny or fine seeds (and pelleted seed), we usually recommend to moisten and lightly firm the soil prior to sowing them on top of the soil, and then lightly water them in with a fine mist.
- Improper soil conditions: Heavy, compacted soil makes it difficult for young seedlings to emerge. If your soil is clay based and heavy, use additional light soil or a seed starting mix to cover your seeds. A seed starting mix is finer than regular mixes and is ideal for new seeds to emerge whether planting indoors or directly seeding outdoors.
- Temperature too cool: Temperature is very important for successful germination. Nature causes each type of seed to awaken at a certain soil temperature. Whether your soil conditions are too cool or too warm, your seeds will not properly sprout. Most vegetable and flower seed varieties like constant warmth to germinate. We often use an electric heating mat if starting indoors which will raise the soil to an ideal temperature. If planting directly outdoors, we have mentioned that it is best to plant at the proper time indicated with each individual seed type. This will increase seed germination rates and decrease germination times. Some varieties like cooler temperature. Windowsills provide widely fluctuating temperatures and are not the best location for starting seeds.
- Improper moisture: Seed must be kept consistently moist after planting. We use clear plastic domes over our seed trays to prevent drying out. A little moisture is all that's needed. A lot of water, especially for prolonged periods, causes seeds to rot in the soil. In the garden you can increase drainage by elevating the soil, or using raised beds. This is especially useful in rainy, spring weather.
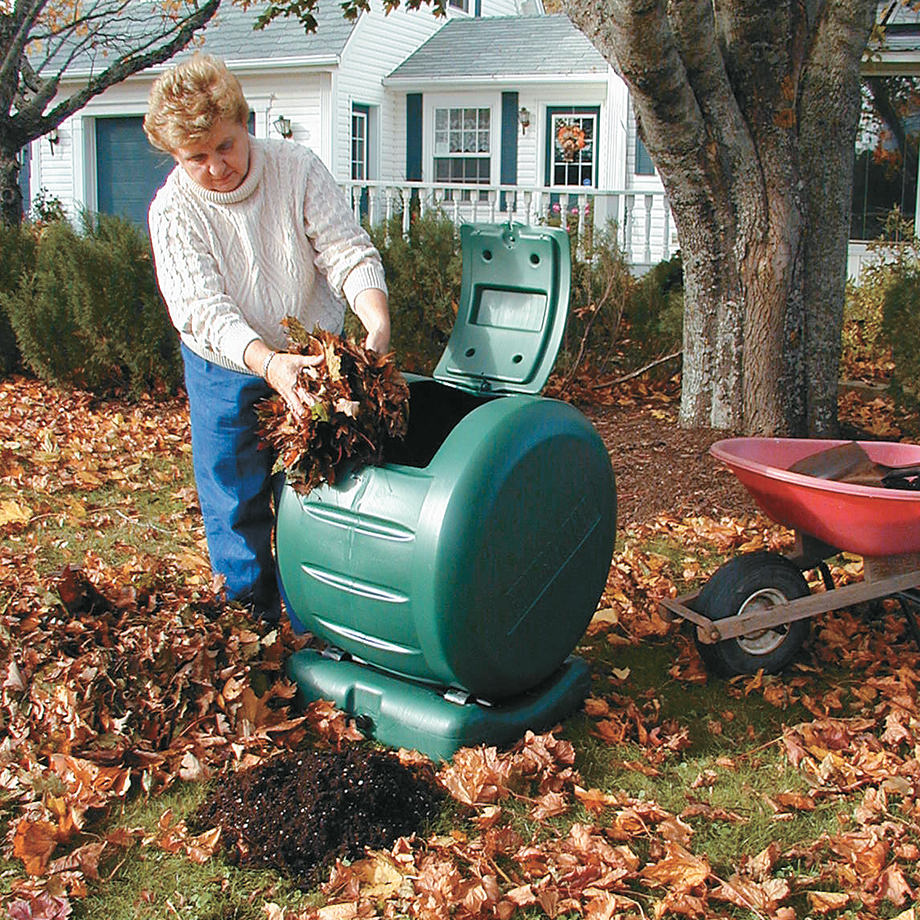
Composting in your own Backyard
Composting will bring many rewards to both you and your garden. Kitchen scraps add up quickly and reduce the overall garbage waste going to landfills. Begin this pile in the fall, start by gathering up some old twigs or branches or corn stalks for the base. Next, get a piece of perforated PVC pipe about 5-6 feet in length and drive it down into the bottom layer. Build the rest of the pile around the pipe; it serves to provide an air source to the middle of the pile.
On top of the first layer of brush, add 6″ of leaves or straw, topped with 2″ of kitchen scraps or grass clipping or weeds. Then add a 2-3″ layer of fresh manure, garden soil or previously made compost. Continue to layer starting with straw or leaves, until the pile is of a manageable height or until your materials run out. A good sized compost pile is about 3 feet by 3 feet and 3-5 feet tall. Be sure to water each layer as you build the pile and water afterwards, if the pile is drying out.
A heap made this way will take about 1 year to break down. If you would like the compost sooner you can mix the pile every so often. Preformed compost bins are also available to enable an easy and successful start in creating your own composted fertilizer for your garden.
Worm Composting
What is the benefit of composting with worms?
This process speeds up the natural breakdown of once living material into the nutrients that plants can use. In full operation, your worm composter can house 10,000 to 12,000 worms, helping microorganisms process up to 5 pounds of food waste and junk mail a week.
How do I Start Worm Composting?
Begin with shredded paper, and a type of coir fiber material. You will need to add a handful of decayed leaf litter or active compost. It is very important to have your bin ready and waiting for your worms. Worm composting can be a slow process to get under way, but once it is in full operation, you will be harvesting plenty of worm castings on a regular basis. It may take up to about a year for your worm composter to become fully operational, but is so rewarding in the end.
Tips to keep in mind
- You can overfeed the worms. If you add nothing to the tray, the worms will rework the existing material almost endlessly, underfeeding is rarely ever a problem.
- Avoid salty foods, citrus peels or anything acidic, oils, meat and dairy products. They can be harmful to the worms.
- Avoid leaves and needles from plants such as bay, eucalyptus, magnolia, pine, fir and cedar.
- Avoid leaving the worm composter in the sun, this will certainly raise the temperature of your composter above the maximum 26°C during the summer.